Views: 0 Author: Site Editor Publish Time: 2026-08-28 Origin: Site

A mechanical timer looks simple until its dial, pins, and tiny arrows start causing confusion.
The good news is that most models follow one of two setup methods. One counts down minutes. The other switches an appliance on and off each day.
This guide explains how to identify your timer, set it correctly, test it, and solve common problems.
Before moving any dial, identify the timer type. This single step prevents most setup mistakes.
A countdown timer measures a chosen duration, usually up to 60 minutes. You turn its knob, the dial returns toward zero, and a bell sounds. Kitchen timers and visual study timers usually follow this design.
A 24-hour mechanical plug-in timer controls power on a repeating daily schedule. It has a clock face plus pins, tabs, or removable trippers. Those controls mark when a lamp, fan, or another suitable appliance receives power.
Timer type | Main controls | What you set | Typical use |
Wind-up countdown timer | Numbered knob and pointer | Minutes remaining | Cooking, exercise, short tasks |
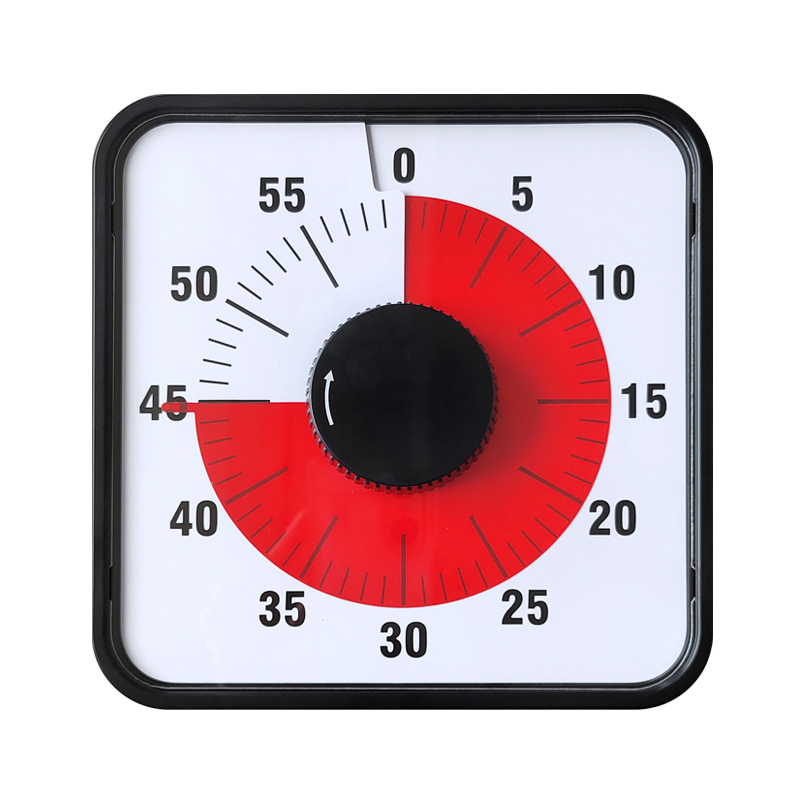
Visual mechanical timer | Dial and colored disk | Minutes remaining | Study, classrooms, meetings |
Plug-in timer | 24-hour dial, pins, override | Daily on/off periods | Lamps, fans, seasonal lights |
Tripper time switch | Clock dial, ON/OFF trippers | Equipment schedule | Pumps, lighting, ventilation |
Next, read every label around the dial. Look for a fixed arrow, AM and PM markings, interval numbers, and a Timer or Auto position. Count the movable tabs within one hour. Four tabs mean 15-minute intervals, while two usually mean 30-minute intervals.
Pin direction is not universal. Many models use pins down for ON and pins up for OFF. Some reverse this arrangement. Printed instructions on your unit always take priority.
GreatHome, a Fuzhou timer and clock manufacturer established in 2008, combines product development, design, and production. Its Premium Mechanical Kitchen and Study Timers - GreatHome includes battery-free countdown models for kitchens, classrooms, offices, and study sessions.
Finally, inspect the housing before use. Stop if the dial is cracked, the plug is loose, or the knob grinds. Never force a control past its marked stop.
Mechanical countdown timers store energy in a spring. The spring drives gears until the pointer reaches zero. Some models need a full winding motion to power the alarm properly.
The pre-wind step matters most on bell-style kitchen timers. Setting ten minutes from zero may still move the pointer. However, it can leave too little stored energy for a strong alarm. Visual models without bells may use different mechanisms.
1. Place the timer securely. Set it upright on a stable surface. If it has a magnet, attach it to a clean metal surface away from heat.
2. Check the rotation arrow. Most wind-up timers turn clockwise during winding. Never assume, because the printed arrow and product instructions control.
3. Wind the spring when required. Turn the dial clockwise toward 55 or 60 minutes. Stop before the hard limit. This motion stores enough energy for timing and the final bell.
4. Return to the desired duration. Turn the pointer back carefully until it aligns with your chosen number. For a 20-minute task, stop exactly at 20.
5. Let the timer run. Do not hold the dial or move it while counting down. Confirm that the pointer or colored disk changes gradually.
6. Listen for the alarm. The bell should sound when the timer reaches zero. Test a short setting before relying on it for cooking.
Some visual models use a simpler one-way setup. You rotate the knob clockwise directly to the desired duration. Do not pre-wind such a model unless its instructions say so.
GreatHome’s 60 Minute Visual Mechanical Countdown Timer from China manufacturer - Fuzhou Greathome uses a shrinking red disk, mechanical power, and a one-knob control. One square version measures 3.5 × 19 × 19 cm and supports magnetic, desktop, or wall placement.
If the bell sounds weak, try the recommended full-wind procedure again. If the pointer never moves, release the knob and check for damage. Never spray oil inside the housing or open the spring mechanism yourself.
A mechanical outlet timer repeats the same schedule every 24 hours. You must set both the current time and the desired operating periods.
Before starting, write your desired schedule in plain language. For example, write “lamp on at 6:00 p.m.” and “lamp off at 10:00 p.m.” This prevents skipped pins and AM or PM errors.
1. Unplug the timer. Program it before connecting power or an appliance. This keeps your hands away from an energized outlet.
2. Reset the tabs. Move every pin into the default OFF position. Use the printed diagram because pin conventions vary.
3. Find the interval. Count the pins inside one hour. Four pins equal 15 minutes each. Two pins equal 30 minutes each.
4. Set the current time. Rotate the dial only in its marked direction. Align the present time with the fixed arrow. Check AM and PM carefully.
5. Mark the ON window. Move every pin covering the period when power should flow. For 6:00 p.m. until 10:00 p.m., set all pins across those four hours.
6. Select Timer or Auto. A manual override may show ON, OFF, and Timer. Choose Timer or Auto, or the pins will be ignored.
7. Connect the load. Plug the timer directly into a suitable wall outlet. Connect the appliance, then leave its own switch turned on.
8. Test the response. Move the override briefly to ON. The appliance should start. Return it to Timer before normal use.
Some heavy-duty time switches use separate ON and OFF trippers instead of rows of pins. Align current time with the pointer, then hand-tighten each tripper at the required time. Do not overtighten it. Model-specific setup guidance shows why instructions can differ.
For a quick schedule test, rotate the dial slowly toward the next programmed event when the manual permits it. Listen for a click and watch the appliance change state. Then reset the dial to the correct current time.
Test the timer before using it for food, lighting, or equipment. A short check can separate a setup error from a damaged mechanism.
For a countdown timer, set two or three minutes. Watch the pointer move and confirm the alarm at zero. For a plug-in timer, try the manual override first. Then check whether the dial advances after remaining powered for a while.
Problem | Likely cause | Practical fix |
Timer stays on | Override remains on | Switch it to Timer or Auto |
Timer stays off | Appliance switch is off | Turn the appliance on and retest |
Schedule starts late | Current time is misaligned | Reset the dial, including AM or PM |
Pins appear ignored | Pins are reversed or incomplete | Check the marked ON position and press each pin fully |
Dial stops after an outage | Clock motor lost power | Restore power and reset current time |
Countdown bell is weak | Spring was not fully wound | Wind toward the maximum, then set the duration |
Timer clicks but nothing runs | Load, outlet, or plug issue | Test the appliance directly and check ratings |
A plug-in mechanical timer may tick quietly during normal operation. Grinding, heat, discoloration, a burning smell, or intermittent power is different. Unplug the unit immediately if you notice those signs.
Do not expect a 24-hour timer to follow weekdays and weekends separately. Basic mechanical plug timers repeat one daily pattern. Choose a seven-day digital model when different schedules are essential.
Also remember that many plug timers use a small synchronous motor. The dial can stop during a power cut, even though the pins remain in place. Reset the current time after power returns.
If a countdown timer stops early, place it upright and repeat the setup. Cold grease, dirt, impact damage, or worn gears may affect movement. Replace a damaged timer instead of forcing the knob.
Correct programming does not make every appliance compatible. Read the timer label for voltage, maximum current, wattage, and supported load type. Motors and heaters can demand more current than lamps.
Use an indoor timer only in a dry indoor location. Outdoor lighting needs a timer specifically rated for weather exposure, plus suitable outlet protection. Keep portable countdown timers away from steam, open flames, hot oven surfaces, and sink edges.
Before each plug-in use, check the pins, housing, and plug. Stop using anything cracked, loose, scorched, or unusually warm. Avoid daisy-chaining timers, adaptors, and power strips. If an extension cord is unavoidable, follow electrical cord safety guidance and match its rating to the connected equipment.
Turn controls only in the marked direction. Gentle movement protects small gears and springs.
Keep the face clean using a soft, dry cloth. Moisture and cleaners can enter the mechanism.
Store the timer without pressure on its knob. A drawer full of heavy tools can bend the pointer.
Recheck the current time monthly. Also check it after outages or seasonal clock changes.
Test the alarm before timing important food. A short test takes less time than replacing a meal.
Mechanical timers work best for repeatable routines. Try 25-minute study blocks, timed classroom activities, meeting segments, cooking stages, exercise intervals, or predictable lighting schedules. Their simple controls also help users avoid phone distractions.
Choose the range and display for the intended task. A large visual disk suits group activities, while a compact bell timer fits cooking. Plug-in pins work better for repeating power schedules. Clear markings matter more than decorative shapes when several people share the timer.
For distributors and project buyers, GreatHome offers mechanical timer options plus OEM logo, color, and packaging customization. Match the dial style, alarm, placement method, and timing range to the intended user instead of choosing only by appearance.
Setting a mechanical timer becomes easy once you identify its type.
Wind a countdown model correctly, or align current time before programming plug-in pins. Then select Timer mode and test the result.
Follow the model’s arrows, ratings, and instructions. Those small checks protect both timing accuracy and connected equipment.
A: Most countdown timers wind clockwise, while many plug-in dials also move clockwise. However, designs vary. Follow the arrow printed on the timer, and never force the dial backward or beyond its stop.
A: Turning near the maximum tensions the spring enough to drive the gears and alarm. After winding, return the pointer to the desired duration. Skip this step when the model specifies direct one-way setting.
A: Pins down often mean ON, but the convention is not universal. Check the diagram on the timer. Set every pin across the complete operating window, not only the first pin.
A: A basic 24-hour mechanical timer repeats the same pin schedule daily. It will continue until you change the pins, select manual override, unplug it, or lose power.
A: Reset the current time on mains-driven plug-in or wall timers because their clock motors may stop during the outage. A spring-driven countdown timer normally needs no reset unless it was running.
A: Only use a model specifically rated for outdoor conditions. Keep connections protected from water, follow the product’s enclosure requirements, and never expose an indoor timer to rain or damp ground.